Transform Your Porch: How to Paint Concrete Like a Pro
Transform Your Concrete Porch in a Weekend
Painting concrete porch is a cost-effective way to refresh your home’s curb appeal and extend the life of your outdoor living space. Here’s what you need to know:
Quick Guide to Painting a Concrete Porch:
- Clean thoroughly – Pressure wash and degrease
- Repair cracks – Fill with concrete patch compound
- Etch surface – Apply concrete etcher for better adhesion
- Prime – Use concrete bonding primer
- Paint – Apply 2 coats of porch and floor paint
- Seal (optional) – Add clear sealer for protection
- Cure – Wait 48-72 hours before replacing furniture
A concrete porch is often the first thing guests notice when approaching your home. Over time, these surfaces can become stained, cracked, or simply look dated. The good news is you don’t need to rip out and replace your concrete – a fresh coat of specialized paint can transform the space in just a weekend.
When done correctly, painting your concrete porch not only improves aesthetics but also adds a protective layer against weather damage, stains, and wear. While many homeowners choose acrylic latex porch paints for their ease of use, professionally applied polyaspartic coatings provide superior durability and longevity.
I’m Hayley Shahbazi, Manager at Galaxy Concrete Coatings, where I’ve overseen countless concrete porch painting and coating projects across residential and commercial properties, refining our installation techniques to ensure lasting, beautiful results for our customers.

Why & When to Refresh a Concrete Porch

Is your concrete porch looking a bit… sad? You’re definitely not alone. I can’t tell you how many homeowners describe their porches to me as “dreary,” “stained,” or my personal favorite, “the eyesore of the neighborhood.” After years of enduring harsh sun, rain, snow, and the occasional spilled drink, even the toughest concrete surfaces start to show their age.
One homeowner recently told me, “I finally tackled a project I have wanted to tackle for quite some time, and I am happy to report I am thrilled with the after!” This is exactly the kind of excitement I hear from people who take the plunge and refresh their concrete porches.
Benefits of Painting Your Concrete Porch
When you’re considering painting concrete porch surfaces, the benefits go way beyond just making it look pretty (though that’s certainly a big plus!).
A fresh coat of specialized paint creates an instant facelift for your home’s appearance. Think of it as makeup for your house – it can hide a multitude of sins! But unlike makeup, a good concrete coating actually protects the surface underneath, extending its lifespan by shielding it from damaging UV rays, moisture penetration, and stubborn stains.
The cost savings are impressive too. While replacing a concrete porch might set you back thousands of dollars, a DIY painting project typically costs around $200-400. That’s a fraction of replacement costs, and you’ll still get that “wow” factor when friends come over.
I love how one homeowner put it: “After a year of weather exposure including sun, rain, and snow, the painted stripes on our porch still look great.” That’s the kind of durability we’re talking about with proper application and quality products.
Beyond aesthetics, painted concrete is actually safer. By adding anti-slip additives to your paint, you can prevent those heart-stopping slips when the surface gets wet. Plus, the smooth, sealed surface makes cleaning a breeze – just a quick sweep or hose-down instead of scrubbing at embedded dirt.
When to Paint Your Concrete Porch
Timing is everything when it comes to painting concrete porch surfaces. The ideal scenario? Your concrete has minor cosmetic issues but remains structurally sound, and you’ve got 3-4 consecutive days of dry weather with temperatures between 50-90°F.
If you’ve just poured new concrete, patience is key – give it at least 30 days to fully cure before painting. And if you’re noticing stains that refuse to budge no matter how aggressively you scrub, that’s another sign it’s time for a refresh.
Weather considerations are crucial too. I once had a client who ignored the forecast and ended up with rain-spotted paint that had to be completely redone. Don’t be that person! Check your local weather app obsessively before starting this project.
Comparing Concrete Coating Options
When it comes to refreshing your concrete porch, you’ve got several options, each with its own personality and performance profile:
Acrylic Latex Porch and Floor Paint
The friendly, approachable option in the concrete coating world. Acrylic paints are water-based, making cleanup as simple as a quick rinse with the garden hose. At $30-60 per gallon (covering about 400 square feet), they’re budget-friendly and available in practically any color you can imagine.
The downside? They’re not the marathon runners of the coating world. With a lifespan of 2-5 years, they’ll need more frequent touch-ups, especially in high-traffic areas. Think of acrylic as the starter option – great for beginners or those testing out a color scheme.
Epoxy-Based Floor Paint
The middle-ground option that brings more durability to the table. Epoxy coatings form a hard, glossy surface that stands up well to chemicals and oil spills, making them popular for garage floors. With a lifespan of 5-7 years and coverage of 300-500 square feet per gallon at $50-100, they represent a step up in both performance and price.
However, epoxies have a significant weakness – they don’t play well with sunlight. UV exposure causes yellowing over time, which isn’t ideal for outdoor porches. They’re also less breathable, which can trap moisture and lead to adhesion problems down the road.
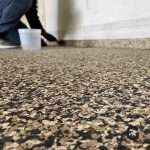
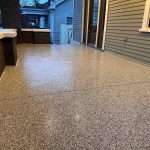
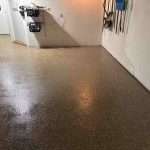
Polyaspartic Coatings (Professional Application)
The premium option that professional installers like us at Galaxy Concrete Coatings specialize in. Polyaspartic coatings are the thoroughbreds of concrete coatings – exceptionally durable (10+ years), rapidly curing (usable within 24 hours), and completely unbothered by UV exposure (no yellowing).
These coatings remain flexible as they age, which means they’re less likely to crack when your concrete shifts slightly with temperature changes. The downside? They’re not typically DIY-friendly due to their short working time during application, which is why professional installation is recommended.
As one customer told me after we installed a polyaspartic coating on their porch: “It’s been three years of heavy use, multiple furniture rearrangements, and countless spilled drinks, and it still looks like we just had it done yesterday.”
Choosing the Right Coating
Selecting the perfect coating for your concrete porch isn’t just about price – it’s about finding the right match for your specific situation.
If you live somewhere with dramatic temperature swings (I’m looking at you, Denver and Cincinnati), polyaspartic coatings are your best friend. Their flexibility helps them adapt to the freeze-thaw cycles that can crack lesser coatings. In Phoenix or Tucson, their superior UV resistance prevents degradation under that intense desert sun.
Consider your traffic patterns too. Is your porch the main entrance to your home, with kids, pets, and delivery people tramping across it daily? Or is it more of a decorative feature that sees occasional use? High-traffic areas benefit significantly from more durable coatings like polyaspartics.
The finish you desire plays a role as well. As one homeowner finded: “I almost wish I would have gone one level darker because it reads much lighter on the flat surface.” This is a great point – outdoor paint always appears lighter on horizontal surfaces due to increased light reflection. When choosing colors, go a shade or two darker than you think you want.
Safety should never be an afterthought, especially for outdoor spaces. Most quality concrete coatings allow for the addition of anti-slip materials – tiny particles that create traction without changing the appearance of your finish. This is particularly important if your porch gets regular water exposure.
Finally, think about long-term value. While DIY options like acrylic paint cost less initially, professional polyaspartic coatings often provide better value over time. When you factor in the cost of materials, your time, and the frequency of reapplication, professional coatings can actually be more economical in the long run.
Tool & Material Checklist
Before diving into your painting concrete porch project, gather these essentials:
For preparation, you’ll need a pressure washer (3000+ PSI is ideal), stiff-bristle brushes for stubborn spots, and a putty knife for scraping away loose material. Don’t forget plastic sheeting and painter’s tape to protect surrounding areas – paint splatters on brick or siding are no fun to remove!
Safety should never be an afterthought. Chemical-resistant gloves, splash-proof goggles, and a respirator mask are must-haves, especially when working with etching solutions. Your knees will thank you for investing in good knee pads, too.
Surface preparation materials include concrete cleaner/degreaser, etching solution (typically muriatic or phosphoric acid-based), and patch compound for filling cracks. Pro tip: use plastic watering cans and buckets for acid application – never metal, as the acid will react with it.
For the actual painting, you’ll need concrete bonding primer, specialized concrete and porch floor paint, a ½-inch nap roller (the nap thickness is important for concrete’s texture), and an angled brush for cutting in edges. Consider adding anti-slip additive to your paint for safety.
If you’re feeling creative, pick up some stencils and contrasting paint colors. I’ve seen homeowners create gorgeous faux rugs and patterns that completely transform ordinary concrete into conversation pieces.
Budget-wise, expect to spend $200-400 for a DIY project, depending on your porch size and the quality of materials you choose. While professional polyaspartic coating installation costs more upfront, its superior durability and professional application often provide better long-term value.
For those interested in learning more about concrete paint coverage and options, Better Homes & Gardens offers excellent guidance. And if you’d like to explore different concrete floor covering options in depth, our detailed guide has you covered.
Step-by-Step Guide to Painting Concrete Porch
Let’s roll up our sleeves and transform that tired concrete porch into something that’ll make your neighbors do a double-take! With some elbow grease and the right approach, your painted concrete porch can become the showpiece of your home’s exterior for years to come.
I’ve guided hundreds of homeowners through this process, and while it takes some work, the results are absolutely worth it. Let’s break it down into manageable steps:
Assessing & Repairing Cracks
Before a single drop of paint touches your porch, we need to address any damage. Think of this as the foundation of your project—skip it, and you’ll be repainting much sooner than you’d like.
First, take a slow walk across your porch and thoroughly inspect the surface. I like to mark problem spots with chalk so I don’t miss anything. Pay special attention to edges and corners where cracks often begin.
The severity of cracks matters tremendously. Hairline cracks (under 1/8 inch) are usually cosmetic and can be filled with a simple concrete patch compound. Medium cracks (1/8 to 1/4 inch) require deeper filling and sometimes widening first to ensure the patch material adheres properly. For large cracks over 1/4 inch, pump the brakes—these might indicate structural issues that need professional attention before you proceed.
When preparing cracks for repair, don’t just fill them as-is. Use a concrete grinding wheel or chisel to create a “V” shape in the crack. This might seem counterintuitive (making the crack bigger?), but this shape provides much better adhesion for your patch material. Trust me on this one—it’s a game-changer for durability.
One homeowner I worked with shared: “Fill cracks and holes with masonry sealer or concrete filler; let dry. Grinding down old silicone and high crack edges made the surface much smoother than I expected.” She was right—these details make all the difference in the final appearance.
After filling cracks, patience is key. Most concrete patches need a full 24 hours to cure properly before you move forward. I know you’re eager to see that beautiful new color, but rushing this step can ruin your entire project.
“Poor guy! This work was pretty back-breaking for sure and DUSTY!!” noted one of my clients about the crack repair process. Yes, it’s labor-intensive, but your back will thank you for doing it right the first time—rather than redoing the entire project in a year.
Preparing Surface for Painting Concrete Porch
I always tell my clients: “The paint job is only as good as the prep work.” This isn’t just a catchy saying—it’s the absolute truth when painting concrete porch surfaces.
Start by clearing the area completely. Remove every planter, doormat, and piece of furniture. Sweep away all debris and cover adjacent surfaces with plastic sheeting and painter’s tape. This might seem obvious, but you’d be surprised how many people try to work around objects and end up with messy results.
Next comes the deep clean. Begin with a basic rinse using a pressure washer (nothing beats the satisfaction of watching years of grime disappear in seconds). For oil stains—and most porches have them—apply a concrete-specific degreaser and let it work its magic. Stubborn stains might require TSP (trisodium phosphate) cleaner. Get in there with a stiff-bristle brush, put some muscle into it, then rinse everything thoroughly.
One homeowner told me: “Pressure washing old concrete is one of the most satisfying chores on the planet.” I couldn’t agree more—it’s like revealing a hidden canvas beneath years of dirt.
After cleaning, give your porch a full day to dry completely. Painting damp concrete is a recipe for disaster—trust me, I’ve seen the blistering and peeling that results.
Now for the step many DIYers skip (but professionals never do): etching the concrete. This process microscopically roughens the surface, giving the paint something to grip onto. Without it, even the best paint will eventually peel away.
Put on complete safety gear—this is non-negotiable when working with etching solutions. Mix according to manufacturer directions (for muriatic acid, typically 1 part acid to 10 parts water). ALWAYS add acid to water, never water to acid. This isn’t just chemistry class safety—it prevents dangerous splashing.
Apply the solution with a plastic watering can or garden sprayer, watching for the satisfying bubbling that indicates it’s working. After 5-10 minutes, rinse thoroughly with clean water and allow the surface to dry completely—usually 24-48 hours.
If you’re in a drier climate like Arizona, you might notice some dustiness after etching. A good bonding primer will help address this issue.
Before moving forward, perform a simple moisture test by taping a 2×2 foot piece of clear plastic to the concrete and sealing all edges. If condensation forms underneath after 24 hours, your concrete is still too damp to paint. Patience here saves heartache later.
Painting Concrete Porch: Application & Design Tips
Now comes the part you’ve been waiting for—changing your porch with color! This is where your vision starts coming to life.
Begin by priming the surface with a concrete bonding primer specifically designed for exterior use. Cut in around the edges with a brush first (this gives you more control in tight spots), then roll primer onto the main surface using a 1/2-inch nap roller. The thicker nap helps the primer work into all the little nooks and crannies of your concrete.
Allow the primer to dry completely—typically 4-24 hours depending on temperature and humidity. You can skip a second coat of primer if the first coat achieves full, even coverage.
When applying the first coat of paint, start at the farthest point from your exit to avoid painting yourself into a corner (yes, people really do this!). Cut in edges with a brush, then roll paint in even, slightly overlapping strips. Apply thin coats rather than one thick coat—this might seem counterintuitive, but thin coats adhere better and dry more evenly.
Let the first coat dry completely—usually 12-24 hours depending on conditions. Patience here is crucial; a second coat applied too soon can lift the first coat and create a mess.
For the second coat, follow the same process. Consider adding an anti-slip additive to this final coat—about 1 pound per gallon of paint. This simple addition significantly improves traction on wet surfaces, potentially preventing nasty falls during rainy weather.
Want to add some personality? Decorative elements can take your porch from nice to wow-worthy. For a stenciled design, position your stencil and secure with painter’s tape. Use a foam roller with minimal paint, applying with light pressure to prevent bleeding under the stencil. Remove the stencil carefully and allow to dry before repositioning.
One of my clients created simple stripes by measuring and marking with chalk, applying painter’s tape, painting with a contrasting color, and removing the tape while the paint was still slightly wet for cleaner lines. “Gray and white stripes are playful but classic and add character,” she shared. The result transformed her porch from boring to magazine-worthy.
Don’t stress about perfect application with decorative elements. As another homeowner noted, “Imperfections in stenciling add charm and uniqueness.” That handmade quality often adds character that perfect machine-precision lacks.
The change can be truly remarkable. One homeowner exclaimed, “I feel like every time I’ve stepped out the door I am in sunny Florida… even though it was in the 30’s this morning!” That’s the power of a well-executed painted concrete porch—it can transport you somewhere else entirely.
Sealing, Safety & Maintenance
The final steps of your painted concrete porch project might not be the most exciting, but they’re crucial for ensuring your hard work pays off for years to come.
First, consider applying an optional sealer. While not strictly necessary, a good sealer provides improved protection against stains, UV damage, and general wear. It also makes cleaning significantly easier. The downside? Sealers can increase slipperiness when wet, so if you go this route, make sure to include an anti-slip additive.
For application, wait until your paint is fully cured (typically 24-48 hours), then apply with a roller or sprayer in thin, even coats. Allow 48-72 hours of dry time before placing furniture or heavy foot traffic on the surface. I know it’s tempting to rush this final step, but patience here preserves all your hard work.
Safety should be top of mind, especially for outdoor porches. Always add anti-slip additives to paint or sealer—this is non-negotiable in my book. After application, test the surface when wet to ensure adequate traction. You should feel confident walking on your porch even during a rainstorm. If the surface feels too slippery after sealing, add another coat with additional anti-slip additive.
For long-term enjoyment, establish a regular maintenance routine. Sweep weekly to remove debris that can scratch your new surface. Clean spills promptly—especially oil or grease—to prevent staining. Wash with mild soap and water every few months, avoiding harsh chemicals or abrasive cleaners that can damage your paint job.
One homeowner shared this insight: “Stain needs refreshing every year or two depending on climate and traffic; our covered porch still looked fine after a season.” Your specific conditions will dictate maintenance frequency—covered porches typically need less attention than fully exposed ones.
Regarding slipperiness concerns, another DIY painter noted: “It hasn’t gotten wet yet, but I don’t see this making it more slippery due to the existing rough texture.” This highlights an important point—the natural texture of your concrete influences how much anti-slip additive you’ll need.
For deeper cleaning, experts recommend: “Clean worn surfaces with heavy-duty cleaner, let soap sit 20–30 minutes, then rinse.” This approach helps remove embedded dirt before it can damage your paint.
A common question I hear is: “What if my porch is tacky after using the sealant?” The solution is simple but effective: “Hose off excess sealant and use a squeegee to remove residue, repeating as needed until tackiness subsides.”
When it comes to durability expectations, be realistic. One homeowner reported: “Almost 4 years later, the paint ‘held up pretty good’ except in consistently wet areas.” This highlights the importance of proper drainage—standing water is the enemy of any painted surface.
While DIY paints typically last 3-5 years before needing refreshing, professionally applied polyaspartic coatings—like those we offer at Galaxy Concrete Coatings—can last 10+ years with minimal maintenance. These advanced coatings provide superior protection against UV damage, staining, and wear, making them an excellent investment for homeowners looking for long-term solutions.
Professional Polyaspartic Coatings: The Superior Alternative
Let’s be honest – while DIY painting concrete porch projects can be rewarding, they’re not for everyone. If you’re looking for something that lasts longer than a few seasons and doesn’t require you to block off your weekend calendar for touch-ups every couple of years, it might be time to consider a professional solution.
At Galaxy Concrete Coatings, we’ve seen the difference professional polyaspartic coatings make for homeowners who want their porch to look amazing year after year with minimal upkeep. Think of polyaspartic coatings as the “set it and forget it” option for your concrete surfaces.
What makes polyaspartic coatings stand out? For starters, the durability is simply best. While traditional paint might give you 3-5 years before showing significant wear, our polyaspartic coatings regularly last 10+ years even with heavy foot traffic and harsh weather. That’s twice the lifespan (or more!) of typical DIY solutions.
Time is another huge factor. Let’s face it – nobody wants their porch out of commission for a week. Our professional polyaspartic coating system can typically be applied and fully cured in just one day. Yes, you read that right – one day versus the nearly week-long process that DIY painting requires.
If you’ve ever seen a previously beautiful painted porch that now looks faded and yellow-ish, you know the heartbreak of UV damage. Polyaspartic coatings are specifically engineered to resist UV rays, meaning your porch color stays true year after year, whether you’re in the scorching Arizona sun or dealing with the freeze-thaw cycles in Colorado.
Speaking of weather extremes, polyaspartic coatings handle temperature swings beautifully. From freezing winters to blistering summers, these coatings maintain their integrity without cracking or peeling. This is particularly important for outdoor porches that face the full brunt of Mother Nature’s mood swings.
For those concerned about safety, our formulations include slip-resistant additives that provide secure footing even when wet – crucial for those unexpected summer storms or morning dew. And maintenance? Just a simple sweep and occasional mop is all that’s needed – no special cleaners or annual resealing required.
While the initial investment for professional polyaspartic coatings is higher than a DIY paint job, the long-term math speaks for itself. When you factor in the cost of materials, tools, and your valuable time for multiple DIY repainting projects over a decade, professional installation often comes out ahead financially – not to mention the stress and backaches you’ll avoid!
If you’re ready to transform your concrete porch with a solution that truly lasts, we serve homeowners across Denver, Colorado, Phoenix, Arizona, Tucson, Arizona, Cincinnati, Ohio, and Indianapolis, Indiana. Our team would be happy to show you samples and discuss how polyaspartic coatings can give your porch a premium finish that truly stands the test of time.
Conclusion
Let’s face it – there’s something deeply satisfying about changing your outdoor space with your own two hands. Painting concrete porch surfaces isn’t just about aesthetics (though that fresh, clean look is certainly a perk!). It’s about protecting your investment, extending the life of your concrete, and creating a welcoming entrance to your home.
After guiding countless homeowners through concrete changes, I’ve seen how a weekend project can bring years of enjoyment. The key is doing it right from the start.
Think of preparation as the foundation of your project. Just like you wouldn’t build a house on shifting sand, you shouldn’t apply paint to dirty, damaged concrete. That thorough cleaning, proper etching, and careful crack repair might feel tedious, but they’re the difference between a coating that lasts for years and one that peels after a single season.
Quality matters too. I’ve heard too many stories of homeowners trying to save a few dollars on generic paint, only to find themselves redoing the entire project the following year. Concrete-specific primers and paints designed for foot traffic and outdoor exposure are worth every penny.
Weather can make or break your project. I always recommend checking the forecast and planning for 3-4 consecutive days without rain or extreme temperatures. There’s nothing worse than watching your beautiful new paint job get ruined by an unexpected shower!
Patience truly is a virtue when it comes to concrete painting. Each layer needs proper curing time – rushing between coats or moving furniture back too soon can undo all your hard work. Those extra days of waiting will pay off with years of durability.
For many homeowners, a DIY approach with quality acrylic or epoxy paints provides a beautiful refresh at a reasonable cost. But if you’re looking for truly exceptional performance with minimal maintenance, professionally applied polyaspartic coatings are worth considering.
At Galaxy Concrete Coatings, we specialize in polyaspartic coatings that outperform traditional options in virtually every way. Our one-day installation process means minimal disruption to your life, and our lifetime warranty provides peace of mind that DIY solutions simply can’t match. The coatings resist UV damage, chemicals, stains, and wear far better than even the best DIY products on the market.
We’re proud to serve homeowners and businesses throughout Denver, [Colorado](https://galaxyconcretecoatings.com/colorado/denver/), Phoenix, [Arizona](https://galaxyconcretecoatings.com/arizona/phoenix/), Tucson, [Arizona](https://galaxyconcretecoatings.com/arizona/tucson/), Cincinnati, [Ohio](https://galaxyconcretecoatings.com/ohio/cincinnati/), and Indianapolis, [Indiana](https://galaxyconcretecoatings.com/indiana/indianapolis/).
Whether you choose to roll up your sleeves for a DIY weekend project or call in the professionals, your newly refreshed concrete porch awaits – ready to welcome guests, withstand the elements, and make you smile every time you come home.